> ## Documentation Index
> Fetch the complete documentation index at: https://support.snowie.ai/llms.txt
> Use this file to discover all available pages before exploring further.
# Voice Settings
> Configure how your AI agent speaks and behaves on calls.
## Overview
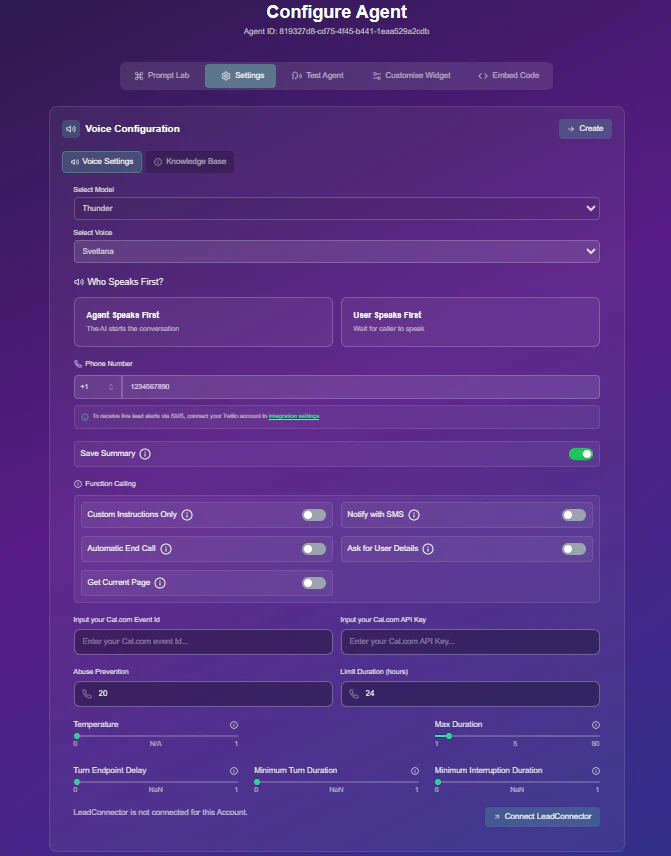
Voice Settings control the core identity of your AI agent. Navigate to the **Settings** tab and select **Voice Settings** to begin.
 ### Core Configuration
* **Model & Voice:** Choose the AI model (e.g., Thunder) and a voice accent that matches your brand.
* **Conversation Flow:**
* **Agent Speaks First:** Optimized for outbound cold calling.
* **User Speaks First:** Optimized for inbound customer support.
* **Phone Number:** Select the dedicated line for this specific agent.
### Video Guide: Voice Setup
Watch a quick tutorial on selecting the right model and configuring your agent's voice.
***
### Function Calling
Enable advanced logic to make your agent more capable.
### Core Configuration
* **Model & Voice:** Choose the AI model (e.g., Thunder) and a voice accent that matches your brand.
* **Conversation Flow:**
* **Agent Speaks First:** Optimized for outbound cold calling.
* **User Speaks First:** Optimized for inbound customer support.
* **Phone Number:** Select the dedicated line for this specific agent.
### Video Guide: Voice Setup
Watch a quick tutorial on selecting the right model and configuring your agent's voice.
***
### Function Calling
Enable advanced logic to make your agent more capable.
 ### Video Guide: Custom Instructions
Learn how to use custom instructions and advanced voice model options to control agent behavior.
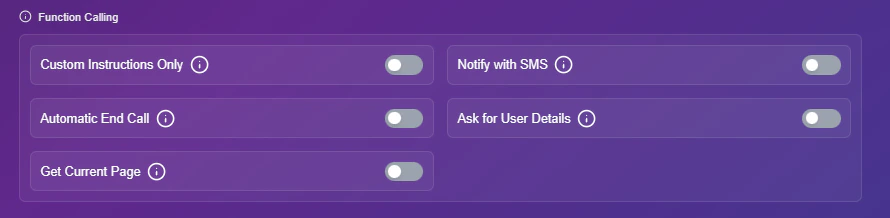
If enabled, the agent will strictly follow the instructions/prompt you provide and bypass its default starting setup.
Turn this ON to receive an automated notification via SMS regarding call activities.
Enabling this allows the agent to intelligently hang up the call when the user indicates they want to end the conversation or says "end call".
Turn this ON to allow the agent to proactively ask for and capture user information such as name, email, and phone number during the dialogue.
This allows the agent to retrieve details and components of the current webpage for better context during the interaction.
***
### Calendar Integration
Enable your agent to book appointments in real-time. Choose your provider below:
If you use **Cal.com**, you can link it directly via API credentials.
1. **Enable Booking**: Toggle on **Calendar Booking** in the Function Calling menu.
2. **Input Credentials**: You will be prompted to enter the following details:
* **Cal.com Event Id**: The unique ID for your specific booking event.
* **Cal.com API Key**: Your personal API key to authorize Snowie.
### Video Guide: Custom Instructions
Learn how to use custom instructions and advanced voice model options to control agent behavior.
If enabled, the agent will strictly follow the instructions/prompt you provide and bypass its default starting setup.
Turn this ON to receive an automated notification via SMS regarding call activities.
Enabling this allows the agent to intelligently hang up the call when the user indicates they want to end the conversation or says "end call".
Turn this ON to allow the agent to proactively ask for and capture user information such as name, email, and phone number during the dialogue.
This allows the agent to retrieve details and components of the current webpage for better context during the interaction.
***
### Calendar Integration
Enable your agent to book appointments in real-time. Choose your provider below:
If you use **Cal.com**, you can link it directly via API credentials.
1. **Enable Booking**: Toggle on **Calendar Booking** in the Function Calling menu.
2. **Input Credentials**: You will be prompted to enter the following details:
* **Cal.com Event Id**: The unique ID for your specific booking event.
* **Cal.com API Key**: Your personal API key to authorize Snowie.
 To book directly into your HighLevel calendar:
1. **Verify Integration**: Ensure your LeadConnector account is linked.
Setup your HighLevel integration here first.
To book directly into your HighLevel calendar:
1. **Verify Integration**: Ensure your LeadConnector account is linked.
Setup your HighLevel integration here first.
 2. **Enable Booking**: Toggle on **Calendar Booking** in the Function Calling menu.
3. **Select Calendar**: Choose your preferred calendar from the dropdown.
2. **Enable Booking**: Toggle on **Calendar Booking** in the Function Calling menu.
3. **Select Calendar**: Choose your preferred calendar from the dropdown.
